Introduction
One of easySIPp's most powerful features is its Click-to-Create XML scenario builder. Instead of manually writing complex SIPp XML files, you can create sophisticated call flows (including PRACK and ReINVITE call flows) through an intuitive point-and-click interface. This tutorial will show you how to use the SIPp XML Scenario Generator to build custom scenarios without writing a single line of XML.
Accessing the XML Scenario Generator
You can access the visual XML builder in two ways:
Method 1: From easySIPp app web-interface
Within easySIPp:
- Click the "Create Xml" tab in navigation
- Start creating the XML just by clicking the intuitive buttons
Method 2: Standalone Web Tool
Visit: https://kiran-daware.github.io/sipp-xml/create.html
This standalone tool runs entirely in your browser and allows you to:
- Work offline (after first load). The xml is completely generated within your browser with client-side JavaScript.
- Create scenarios from scratch with just intuitive clickable buttons
- Download XML files
- Upload them to easySIPp
Understanding the Interface
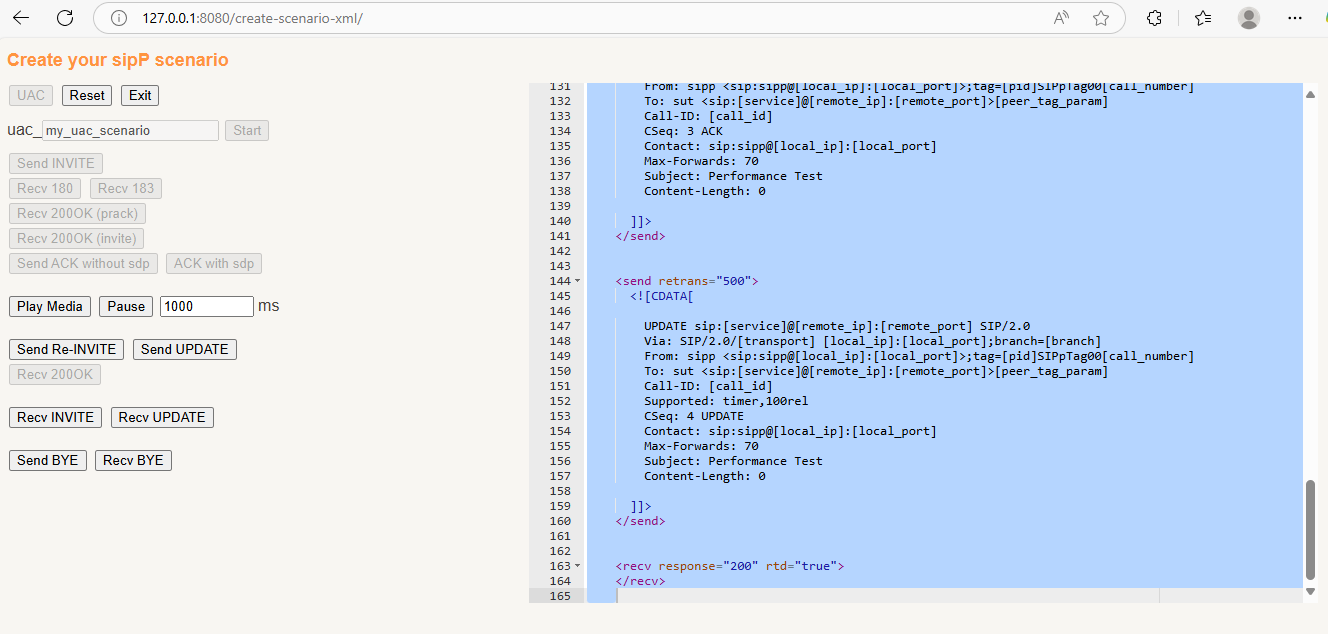
The XML Scenario Generator has a simple, intuitive layout:
Top Controls
- UAC, UAS buttons: Select the type of scenario - client (UAC) or server (UAS). Once you select one of the buttons, a prompt is provided for the Name of your scenario, along with a "Start" button.
- Exit: Return to main page
- Reset: (Visible after you start creating) Click to clear the current scenario and start fresh
Action Buttons
The interface guides you through the scenario creation process in real-time. By enabling only valid action buttons, it acts as a built-in safeguard against malformed logic. For example, once you send an INVITE, the UI contextually reveals the next logical steps, such as 180 Ringing or 183 Session Progress. It’s designed to be intuitive—once you start building, the flow feels natural.
Automatic handling of protocol complexity - CSeq, RSeq etc
Perhaps the most powerful feature is the automatic handling of protocol complexity. You no longer need to manually manage CSeq and RSeq sequence numbers or swap To and From headers during UAC role changes. The scenario creator handles these variables in the background, ensuring your signaling remains RFC-compliant without the manual effort.
Preview Area
On the Right side of the buttons, you'll see a real-time preview of your xml as you build it. You can even edit in this area for some minor tweaks.
Creating Your First UAC Scenario
Let's create a basic UAC (client) scenario that makes a call, stays connected for 30 seconds, then hangs up.
Step 1: Select UAC Mode
Click the "UAC" button at the top to create a client scenario.
Step 2: Click Start
Click the "Start" button to begin your scenario.
Step 3: Send INVITE
- Click "Send INVITE"
- Choose "invite with SDP" OR "without SDP"
What is SDP? The Session Description Protocol (SDP) is used to negotiate media capabilities between endpoints. It defines the specific audio/video codecs, IP addresses, and ports required to establish a media stream.
Step 4: Receive Provisional Responses
Click "Recv 180" to expect a "Ringing" response from the server. And for this example, lets click on "Non-Reliable".
Step 5: Receive 200 OK
Click "Recv 200OK (invite)" to expect the call to be answered.
Step 6: Send ACK
- Click "Send ACK without sdp"
- This acknowledges the 200 OK and establishes the call
Step 7: Add Pcap audio and Call Duration
- Click "Play Media" (inserts play_pcap_audio action in the xml)
- Modify the milliseconds value and click "Pause"
Step 8: Send BYE
- Click "Send BYE" to hang up the call.
- 200 OK for the BYE message is automatically added.
Step 9: Save Your Scenario
- Scroll to the bottom
- Enter a filename (e.g.,
uac_basic_30sec) - Click "Save as a new xml" or "Download xml"
Congratulations! You've created your first SIPp scenario! 🎉
Creating a UAS Scenario
Now let's create a UAS (server) scenario that receives calls and answers them.
Step 1: Select UAS Mode
Click the "UAS" button at the top.
Step 2: Build the Flow
- Click "Start"
- Click "Recv INVITE" - Wait for incoming call
- Click "Send 100" - Send "Trying" response
- Click "Send 180" - Send "Ringing" response
- Click "180 Not Reliable"
- Click "180 without SDP"
- Click "Send 200OK (invite) with SDP" - Answer the call
- Click "Recv ACK" - Expect acknowledgment
- Click "Recv BYE" - Wait for caller to hang up
- Flow automatically sends 200 OK
Step 3: Save
Name it uas_basic_answer and download.
Advanced Features
Reliable Provisional Responses (PRACK)
For carriers that require PRACK (reliable provisional responses):
UAC with PRACK:
- Send INVITE with SDP
- Click "Recv 183" → Select "Reliable"
- Click "Send PRACK without sdp"
- Click "Recv 200OK (prack)"
- Continue with normal flow (Recv 200OK for INVITE, etc.)
UAS with PRACK:
- Recv INVITE
- Send 100
- Click "Send 183" → Select "Reliable" and "with sdp"
- Click "Recv PRACK"
- Click "Send 200OK (prack) without SDP"
- Continue with normal flow
Call Hold and Resume (Re-INVITE/UPDATE)
To simulate putting a call on hold:
UAC Puts Call on Hold:
- After call is established (after ACK)
- Add pause (call active time)
- Click "Send Re-INVITE" or "Send UPDATE"
- Select "with SDP" (modify SDP in the xml preview pane to add
a=sendonlymanually) - Click "Recv 200OK"
- Add another pause (hold duration)
- Send another Re-INVITE/UPDATE to resume
UAS Receives Hold Request:
- After call established
- Click "Recv INVITE" or "Recv UPDATE"
- Click "Send 200OK with SDP"(modify SDP in the xml preview pane to add
a=sendonlymanually) - If INVITE: Click "Recv ACK"
Media Handling
The "Play Media" button inserts play-pcap-audio action in the xml, you may modify the pcap file name if you have uploaded any (in the XML Management tab)
Best Practices
Scenario Naming Convention
# Good naming examples:
uac_basic_30sec.xml          # Basic UAC, 30 second call
uas_prack_hold.xml           # UAS with PRACK and hold
uac_failover_486.xml         # UAC handling 486 Busy
uas_early_media.xml          # UAS with early media (183)
SDP Quick Reference
- INVITE: Initial offer (Early Offer) or empty (Late Offer).
- 200 OK (INVITE): The answer (if INVITE had SDP) or the offer (if it didn't).
- ACK: Typically empty, but carries the answer in Late Offer scenarios.
- Re-INVITE/UPDATE: Used mid-call to refresh or modify media parameters.
- PRACK: Used to acknowledge reliable provisional responses; usually doesn't carry media info. In standard flows, it rarely contains SDP unless specific preconditions are being met.
Tips for Complex Scenarios
- Start simple: Build basic flow first, to get used to the interface first.
- Validate as you go: XML Preview feature is the easiest way to verify that your headers—like CSeq and SDP—are being generated exactly how you expect.
- Match production: Mirror your actual SIP server's behavior
- Document your flows: Use descriptive filenames
- Keep backups: Save working scenarios before modifying
Next Steps
Now that you can create custom XML scenarios, explore:
- Advanced SIP Load Testing - Scale up your tests
Summary
In this tutorial, you learned:
- How to access and use the visual XML Scenario Generator
- Creating basic UAC and UAS scenarios with clicks
- Adding advanced features (PRACK, hold/resume, error handling)
- Best practices for scenario design
You can now create sophisticated SIPp scenarios without writing complex XML! The Click-to-Create builder handles all the complexity while you focus on the call flow logic.